Thursday, November 29, 2012

:::{Chicken Parmesan}:::

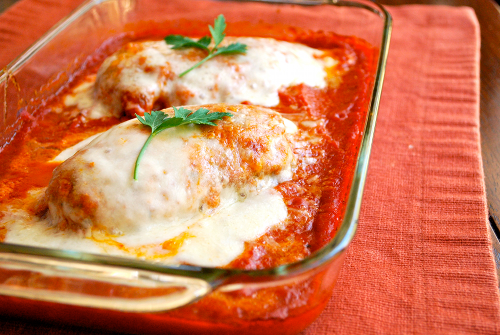
This is one of my very favorite dinners!  I found it on Pinterest (where else?) and am very much in love... It is so tasty!  With its crisp, lightly breaded chicken breast, topped with tomato sauce and smothered with cheese, it is actually, surprisingly easy to make.  According to the blog where I found this recipe, A Sweet Pea Chef, this is restaurant quality chicken parmesan, and I would have to agree.  Husband and I both LOVED this one!

Picture from A Sweet Pea Chef

Chicken Parmesan
(adapted from A Sweet Pea Chef)

Ingredients
2 boneless, skinless chicken breasts
1/2 cup Italian breadcrumbs
1 tbsp dried oregano
1 tbsp dried basil
1 tbsp dried thyme
2 tsp kosher salt
1 tsp ground black pepper
2 tbsp olive oil
2 cups marinara sauce
4 oz fresh mozzarella, thinly sliced
2 tbsp grated Parmesan

Directions
  1. Preheat the oven to 500 degrees F.
  2. Combine the herbs, salt, pepper and bread crumbs in a small dish. 
  3. Cover the chicken breasts with the mixture and shake off any excess.
  4. Heat olive oil in large skillet over Med-High heat.  
  5. Add the chicken and cook just until brown, about 3 minutes per side. 
  6. Place the chicken in 7" x 11" glass bakeware.
  7. Spoon the marinara sauce over and around the chicken. Sprinkle parmesan over each chicken breast, and cover with mozzarella slices.
  8. Bake, covered with foil, for 10 minutes and then uncovered for 5 minutes, or until the cheese melts and the chicken is cooked through.
  9. Serve over cooked pasta, such as spaghetti or linguini noodles.
  10. Enjoy!

Wednesday, November 28, 2012

:::{Marshmallow Carmel Popcorn}:::

Oh my word, I am eating this as I type because it is too good not to share with the world, immediately!  Sooooo yummy!  All warm and gooey and sweet and crunchy!  Sorry hubby, I'm having an affair with a giant bowel of popcorn...
It all began 10 minutes ago.  Husband is off at a banking dinner thing; normally I would go with, but no wifeys allowed at this particular shindig... I was hungry, and nothing in the house looked tasty, so I hopped on my good ol' friend Pinterest, to my board labeled "snackies" (yes I'm that OCD) and started perusing for some munchy inspiration... Personally I love popcorn just about any way you slice it, and had actually pinned two different versions of this same recipe, so I figured this was the one.  Luckily I had a bag of marshmallows left over from camping this summer, so I whipped up this puppy, and it exceeded all my expectations!  I made about a half batch from the original recipe, which called for 3 bags of microwave popcorn; I use an air popper for our popcorn needs, and 3 tablespoons unpopped kernels is equivalent to 1 bag of microwave popcorn, so I used 6 Tbsp and a 1/2 recipe of the caramely goodness.  This amount would be plenty for two people... probably ;)
Make it.  I dare you to not eat the whole daggum bowel yourself... Just try.


Marshmallow Carmel Popcorn
(adapted from One Good Thing by Jillee)

Ingredients
6 tablespoons of unpopped popcorn kernels - popped in an air popper
(or 2 bags microwave popcorn)
1 stick (1/2 cup) of butter
1/2 cup brown sugar
1/2 of a 16oz bag of marshmallows

Directions
  1. Pop your popcorn in a large bowel; I sprayed the bowel with PAM cooking spray beforehand, and I'm glad I did, because the caramel gets pretty stuck once it cools...
  2. In a medium bowel, microwave the marshmallows, butter and brown sugar for 2 minutes (remember marshmallows will expand in the microwave as they heat up, so keep an eye on your bowel and stop it if its about to overflow!)
  3. Take out and stir the delicious mixture, then microwave it for another minute.
  4. Repeat until it becomes thin enough to easily pour over your popcorn, then mix it all up.
  5. It is best while still warm and extra gooey...
  6. Enjoy!
~Rachelle

Tuesday, November 27, 2012

:::{Ham & White Bean Soup}:::

This recipe is adapted from one my momma made frequently when I was growing up.  It is hearty, and tasty, and a great way to make use of some left-over Thanksgiving ham!  My mom would use a ham hock, and boil all the meat off the bone; but I just had a big ol' hunk of cooked ham, so that was what I used!  My mother is an amazing cook; so anytime I can emulate her cooking style, I do!  I feel very fortunate to have grown up with a mom who loves to cook and always tries new things; I would say it is a pivotal factor in my love for making good, hearty, healthy foods!
This is a recipe you will want to start early in the day, because the longer it has to simmer, the tastier it will be!  Plus if you are using dried beans like I did, they take several hours to cook and become soft...  But it is well worth the time it takes, and the stove does most of the work!

Start with your beans.  For the two of us, I used 2 cups, which will allow for plenty of leftovers...
Rinse and sort your beans (picking out any gross looking ones, or pieces of dirt or rocks).  Then place them on the stove in a pot with 2-3 inches of water covering the beans.
Bring them to a boil, and boil for 2-3 minutes.  Then cover and remove the pot from the heat.  Allow them to sit for 1 hour.  During this time you can start chopping your vegetables (onion, garlic, carrots, and celery).

Once the beans are done soaking, drain them and put them back in the pot with some fresh water.  At this point only use as much water as you want broth, I covered the beans with ~1 inch of water, and turn the stove on Med-Low heat.  I then chopped up some onion and garlic and simmered with a little bit of butter.
I then added the diced carrots and chopped celery, and simmered for ~5mins, allowing the veggies to cook a little.
I then added the veggies to the beans, and allow them to start soaking up the flavor.  Side note, when my mom makes this soup, she does not add carrots and celery; they just sounded good to me!  This soup is easy to manipulate and make as simple or complicated as you wish.
I then diced the ham, and added it to the mix.  (See the tasty pile of fat I trimmed off... gotta love pork!)
Cover and allow the soup to simmer for at least 1-2 hours (the longer the better), and season with salt and pepper to taste.
While the soup was gently boiling away, I whipped up a batch of corn bread, which pairs nicely with this soup...  I like to serve this soup as my momma does, with a dish of thinly sliced onion in white vinegar, which can be spooned into your soup.  Or you can eat it like my dad likes to, with Ketchup... Either way, this is a pretty well rounded, tasty meal!


Ham and White Bean Soup

Ingredients
2 cups Great Northern white beans
1 onion (diced)
2-3 cloves garlic (finely chopped)
2 tablespoons butter
2-3 carrots (peeled and diced)
1 heart of celery (chopped)
~1/2 a ham (diced) or 1 ham hock (boiled)
water

Directions
  1. Rinse and sort 2 cups white beans.
  2. Place rinsed beans in pot with enough water to cover by 2-3 inches, bring to a boil.
  3. Boil for 2-3 minutes; cover, remove from heat, soak for 1 hour.
  4. Drain the water from the beans.
  5. Place the beans back in the pot with ~1 inch of water covering them.
  6. Saute the onion and garlic with butter.  Add the carrots and celery.  Simmer for ~5 minutes.
  7. Add the veggies to the beans.
  8. Dice your ham and add to the soup.
  9. Bring to a simmer (med-low heat), and simmer for 1-2 hours; at least until beans are soft.  Salt and pepper to taste.
  10. Enjoy!

Corn Bread

Ingedients
1 cup yellow corn meal
1 cup flour
1/4 cup white sugar
1 tablespoon baking powder
1 teaspoon salt
1 cup milk
1/3 cup vegetable oil
1 large egg

Directions
  1. Preheat oven to 400 degrees F.  Grease 8x8 inch pan.
  2. Mix corn meal, flour, sugar, baking powder and salt in a medium bowl.
  3. In a small bowl, lightly beat the egg, then add milk and oil; mix well.
  4. Add the wet ingredients to the dry ingredients and stir just until blended.  Pour into prepared pan.
  5. Bake for 20-25 minutes or until toothpick comes out clean.
  6. Serve warm with butter and honey (yum!).
  7. Enjoy!
~Rachelle

Monday, November 26, 2012

:::{Coconut Oil: 1 week update}:::

So, I have been using coconut oil for one week, and I must say, I love it!  For most of my life, I have lived in very dry climates (long, cold, dry Alaska winters; and Idaho, which is virtually a desert), so about this time of year, my face starts to get these irritating dry/flaky patches, regardless of how often I moisturize.  But since using a dab of coconut oil as my night time moisturizer, my face has been soft, smooth, and blemish free.  I could not be more pleased!  I have found, when I use it at night, the entire next day, I don't need any lotion on my face, even after washing it.  For me, it absorbs nicely and leaves my face emolliated for 24 hours. 
Then there is my hair.  I have not had a chance to do another deep conditioning treatment (next I think I will try a hot oil treatment, as recommended by Crunchy Betty here and here), but I have been using coconut oil in lieu of hair product.  This is kind of a big deal for me, because I have wavy/curly hair that tends towards frizzy and unmanageable; I'd say nine days out of ten I wear it pinned back or up.  I prefer natural hair, so I don't straighten it very often and don't even own a curling iron, and it is my natural hair color.  However, I have a full array of products that I have tried and regularly use in my hair; I have tried every serum, gel, mousse and spray I can get my hands on and have never found one I really love!  They either don't help with the frizz and therefore are pointless or are too heavy and just weigh the curls down leaving my hair flat, gross, or crunchy.  So, you can imagine my surprise and delight when I can take just a tiny dab of coconut oil (I use a blob about the size of my pinky nail for my shoulder length hair), rub it between my palms, lightly smooth it through damp, towel dried hair, and simply let it air dry, leaving me with soft, bouncy curls.  My hair will never be perfect by my standard, but this is much, much better than it is with many spendy products I have tried...  I will definitely keep using this and trying different formulas in my hair.
Coconut oil?  I'm a believer! The possibilities are endless!

~Rachelle

Wednesday, November 21, 2012

:::{Two Pumkin Pies}::

Thanksgiving is tomorrow!  So today I baked my pies... They are in the oven as I type this, and I am very excited to see how they turn out; they smell amazing already!
Husband and I are going to Jerome, ID (don't worry if you haven't heard of it... it's a tiny, little dairy/farming town, much like most of southern Idaho), to spend the holiday with his parents.  Hubby is a fan of good ol' regular pumpkin pie, so I made one pie for him straight off the back of the can of Libby's pumpkin puree... It is a very easy, straightforward type recipe!  I like spiced up recipes much better; so for my second pie, I went with a streusel topped sweet pumpkin pie (this is the one I'm really excited about!).   For my crusts, I searched high and low for a recipe that excited me, and ended up adapting one from one of my all time favorite blogs, smitten kitchen; if you haven't checked her out before, you simply must!  Its an inspiration!  I've tried several of her recipes and they always turn out spectacularly.  Anywho, without further ado, here are my recipes...

Pie Dough
(adapted from smitten kitchen)
 Makes enough dough for one double-crust, or two single-crust pies.

Ingredients
2 1/2 cups flour
1 tablespoon sugar
1 teaspoon table salt
2 sticks (1 cup) butter, very cold
1/4 cup spiced rum, very cold
1/2-3/4 cup ice-cold water

Directions
  1. In a large bowl (it helped to use a very wide one, so I could get my hands in) whisk together 2 1/2 cups flour, 1 tablespoon of sugar and a teaspoon of salt. 
  2. Dice the two sticks of very cold butter into 1/2-inch pieces, then sprinkle the butter cubes over the flour mix and begin working them in with a pastry blender, working all parts evenly. 
  3. When all of the butter pieces are the size of tiny peas stop. Even if it looks uneven, as this will make the crust flaky and delicious!
  4. Start drizzling 1/4 cup of the rum (I store mine in the freezer) and 1/4 cup of the ice-cold water over the butter and flour mixture, while using a rubber or silicon spatula, gather the dough together. (You’ll probably need an additional 1/4 cup of cold water to bring it together, but add it a tablespoon as a time.)
  5. Once the dough starts to form large clumps, get your hands in there (see how that big bowl comes in handy?). Gather all the damp clumps together into one mound, kneading them gently together.
  6. Divide the dough in half, and place each half on a large piece of plastic wrap, using the sides to pull in the dough and shape it into a disk. 
  7. Let the dough chill in the fridge for at least one hour, but preferably two, before rolling it out.
  8. Place the chilled dough on a floured surface, and with a floured rolling pin, start slowly rolling out your crust.  I rolled mine into 10-12 inch circles, as my pie pans are 9.5 inch deep dish pans.  
  9. Gently place the round in your pie pan, and form the sides as desired (I fluted mine).
If you don't have any liquor on hand, just using ice water would work fine too.  My mom likes to use vinegar in her pie dough (I don't really care for the flavor), and I've read several recipes that use vodka.  I had rum, so that was what I used...
Here they are right before going in the oven... With all the baking mess aftermath!  Pie on the left is the fancy streusel one (pre-streusel) and the pie on the right is regular pumpkin pie
Streusel Topped Chiffon Pumpkin Pie
(adapted from The Girl Who Ate Everything)
Makes 1 (9.5-10 inch) deep dish pie

Ingredients

For the Filling:
1 (15 ounce) can pumpkin puree
1 (14 ounce) can sweetened condensed milk
1/4 cup packed brown sugar
2 egg yolks
1 teaspoon ground cinnamon
1/2 teaspoon ground ginger
1/2 teaspoon ground nutmeg
1/2 teaspoon salt
2 egg whites
1 (9.5-10") deep dish unbaked pie shell
 For the Streusel Topping:
2 tablespoons all-purpose flour
1/4 cup packed brown sugar
1 teaspoon ground cinnamon
2 tablespoons butter, very chilled
1 cup chopped walnuts or pecans
Directions
  1. Preheat the oven to 425 degrees F.
  2. In a large bowl, mix together the pumpkin, sweetened condensed milk, brown sugar, and egg yolks (reserving the egg whites for later).
  3. Stir in 1 teaspoon cinnamon, ginger, nutmeg, and salt.
  4. In a large bowl, whip egg whites until soft peaks form (I chose to hand whip mine with a whisk, which took longer than an electric mixer would, but was quite satisfying).  Gently fold whipped egg whites into the pumpkin mixture. Pour the filling into pie shell.
  5. Bake for 15 minutes; and while the pie is baking, prepare the streusel topping.
  6. For the Streusel Topping: In a small bowl, combine the flour, brown sugar, and 1 teaspoon cinnamon. Blend in the cold butter with a fork or pastry blender until the mixture is crumbly. Mix in the chopped nuts. Sprinkle the topping over the pie.
  7. Reduce the heat to 350 degrees F. Bake an additional 40 minutes, or until set. You may want to cover the pie for the last 15 minutes of baking so that the topping does not burn (I didn't need to, so just keep an eye on your pie). 
  8. Enjoy!

 Libby's Classic Pumpkin Pie
(from the back of a can of Libby's pumpkin puree)

Ingredients

3/4 cup granulated sugar
1 teaspoon ground cinnamon
1/2 teaspoon salt
1/2 teaspoon ground ginger
1/4 teaspoon ground cloves
2 large eggs
1 can (15 oz.)  Pure Puree
1 can (12 fl. oz.) Evaporated Milk
1 (9.5-10") deep dish unbaked pie shell
Directions
  1. Preheat oven to 425 degrees F.
  2. Mix sugar, cinnamon, salt, ginger and cloves in small bowl. 
  3. Beat eggs in large bowl. 
  4. Stir in pumpkin and sugar-spice mixture. 
  5. Gradually stir in evaporated milk.
  6. Pour into pie shell.
  7. Bake for 15 minutes. Then reduce temperature to 350° F; bake for 40 to 50 minutes or until knife inserted near center comes out clean. 
  8. Cool on wire rack for 2 hours. 
  9. Serve immediately or refrigerate.
  10. Enjoy! 
And there you have it!  I will let y'all know how they turned out!
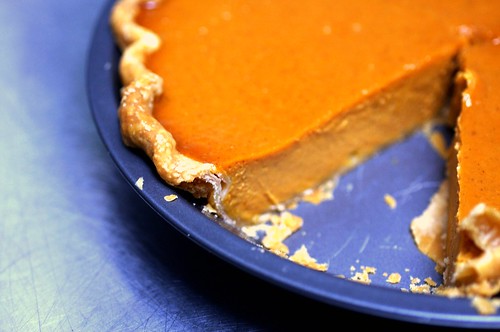
Fresh out of the oven! Yum!
 ***Update*** 11/22/12
Both these pies were AMAZING! And my in-laws loved them! The streusel one was my personal favorite... 
  

Tuesday, November 20, 2012

::{Adventures with Coconut Oil}::

Lately on Pinterest and blogs and everywhere I go, I have been finding coconut oil.  At first, I wasn't really sure what to think; I pinned a few DIY beauty treatments using coconut oil, but didn't really go to any of the link or read anything in depth about it.  One day, I decided to find out what all the hoopla was about, and read some bloggers' testimonials about how coconut oil has changed the way they do everything, from hair deep conditioning, to toothpaste, to deodorant, to cooking.  Supposedly, coconut oil is antibacterial, antiviral, and antifungal, as well.  So out of curiosity the next time I was at the grocery store, I checked out the price.  Let me tell you, it is not cheap!  So I left the little jar on the shelf and continued my shopping.
Then this weekend, my husband and I went and stayed with our good friends who live out of town.  I noticed that on her kitchen counter, there sat none other than a jar of coconut oil.  I inquired and my friend went on to tell me that last year for Christmas, her mom had given everyone a jar, and lately she has been taking a tablespoon a day for stomach problems (she has been diagnosed with ulcers), and it has seemed to have been helping; and also occasionally uses it on her face.  She said her mom and sister use it for everything...  Then she went on to pull a jar out of her pantry and gave it to me, saying that she doesn't go through it fast enough, and didn't want it to go bad.  Needless to say, I was pretty psyched to now have the means to experiment with all those ideas I had encountered!
Last night, I tried it on my face as a moisturizer.  I was a little skeptical of putting it on my face, but countless bloggers assured me that it works wonders; including Family Sponge who lists her reasons for loving coconut oil and how she uses it here.  Note, a little bit goes a long way.  First I washed my face as normal, then took a pea sized amount of coconut oil in my hands, it will quickly start melting in your hand (coconut oil is a solid at room temperature, but melts at body temp), then rubbed it all over my face.  I like the way it feels on my face, but it does take quite a while to absorb, so I probably will not use it during the day under my makeup.  It also works wonderfully as an eye makeup remover; my caked on mascara came right off, and the skin around my eyes feels great.
Yesterday, I tried it as a pre-shower hair deep conditioner; an idea I found through Pinterest, on How Does She?.  Once again remember, a little goes a long way!  I took a small palm-full and worked it through my hair, with my hair flipped upside-down over the tub.  I mostly focused on the ends of my hair, but also massaged it into my roots.  Once it was all worked in, I twisted my hair in a loose bun on top of my head and clipped it up to let it set for ~1 hour.
During that time, I decided to try another coconut oil method I had found previously on Pinterest.  Awhile back, I had read an article on an Ayurveda process called oil pulling.  I had never heard of this before, but supposedly it whitens teeth, strengthens gums, and works as a kind of detoxification.  Skeptical, I read some blogs, which talked about personal experiences and results.  All that I read, stated that they did notice whiter teeth and healthy gums after a few weeks of utilizing this method.  According to this website, it is best to do it on an empty stomach (so first thing in the morning or at least 3-4 hours after eating), because this detoxifying effect is stimulating.  You can read more about it here for further explanations.  What you do, is take ~1 tsp oil (any cooking oil works; I used coconut oil), and swish it around in your mouth for 20 minutes. I did this for the fist time yesterday, and it wasn't as unpleasant as I expected.  It is difficult to ignore the urge to swallow, but once you get the hang of it, it's not too bad.  You are supposed to gently swish it around your teeth, and if your jaw starts to get tired, you are probably swishing more vigorously than necessary.  At the end of 20 mins (or whenever you can't stand it anymore), spit out the oil/saliva mixture and rinse your mouth with salt water to remove any remaining "toxins," then brush your teeth as normal.  I plan to continue trying this method, and I will try to remember to keep y'all updated on what I find.
About the time I was done oil pulling, my hair was ready to be rinsed.  So I hopped in the shower and scrubbed away! I had to shampoo twice to fully rinse out the coconut oil, then I conditioned as normal.  When I'm done showering, I do not use a towel to dry my hair, as the roughness and fibers of a towel causes breakage; I use an old T-shirt.  After ringing as much water as I can out of my hair, I wrap it up in the T-shirt by sticking my head the wrong way through the head hole, twisting the shirt around my hair, then wrapping the whole thing around my head (I'll try to remember to post a picture); I then leave this on my head until my hair is mostly dry.  I noticed, after using the coconut oil, my hair felt very soft and silky, and looks very shiny and healthy all day.  I will definitely be trying this again, probably no more than once a week, as it is pretty time consuming.  I may have overdone the amount of oil I used, as this was my first attempt; next time I will use smaller blobs, multiple times (instead of one big glob at the beginning), until I have completely worked through my hair...  Today I did notice that my hair looks kind of greasy, which is not usually a problem for me; probably because I was not able to get it all completely rinsed out.  This is not an issue, as I usually shower everyday, but may be something to keep in mind...
Side note, several blogs I have read, recommend Nutiva as a good brand of coconut oil.  Vitacost offers a $10 off of a $30 purchase coupon here.  If you purchase through this link, you and I will both get $10 off... I got actually purchased a 78 oz jar of Nutiva from Costco for $21.99 (Dec, 2012)... Best price I've seen so far, plus it will last me quite awhile!

~Rachelle

Monday, November 19, 2012

::{Just like Reese's, Peanut Butter Bars}::

Warning:  These bars are very, very tasty and very, very easy to make!  They taste so much like a Reese's Peanut Butter Cup.  Even my hubby, who does not have much of a sweet tooth at all, loved them. You have been warned...  
Like most of my favorite recipes these days, I found this on Pinterest, and I knew just by looking at the pictures, I had to make them!  Needless to say, they cannot stay in my house, and the majority of them will be sent with my husband to the bank for his coworkers to enjoy... Otherwise I would eat the whole pan, tonight.  Yum!


Peanut Butter Bars

(adapted from Baker Lady)

Ingredients:
1 cup butter melted
2 cups graham cracker crumbs (grind them in a food processor; think tiny granules.)
2 cups powdered sugar
1 cup + 4 tablespoons peanut butter
1 1/2 cups semisweet chocolate chips

Directions
  1. In a medium bowl, mix together the melted butter, graham cracker crumbs, powdered sugar, and 1 cup of the peanut butter until well blended. 
  2. Press evenly into the bottom of an ungreased 9×13 inch pan. 
  3. Using a double boiler, melt the chocolate and peanut butter, stirring occasionally until smooth.  If you don’t have a double boiler like me, you can create one by placing a mixing bowl on top of a soup pot.  Boil water in the soup pot.  The steam will create enough heat to keep your chocolate melted but not enough to burn it. 
  4. Spread the melted chocolate over the peanut butter layer.
  5. Refrigerate for at least one hour before cutting them into squares.  
  6. Enjoy! 

~Rachelle 

Friday, November 16, 2012

:::{Pumpkin pie... GALLORE!}:::

So it is that time of year again: The Holidays.  Thanksgiving is just around the corner... This year, hubby and I will be spending this holiday with his family.  My husband is an only child (not counting the THREE schnauzers his parents currently have), and has a very small extended family.  This has been a bit of a shock to me, because besides my immediate family, consisting of my parents, younger brother, older sister, plus her husband and four kiddoes, we usually spend Thanksgiving with my mother's side of the family, which includes her four siblings along with all the aunts, uncles, and cousins you can shake a stick at!  In this slightly chaotic, but incredibly loving environment, who made what dish quickly gets lost in the shuffle and has always been fairly irrelevant to me.  Therefore, this past weekend when my mother-in-law and I started talking about food plans for the upcoming holiday and she specifically remembered the pecan pie I made last year, it came as a bit of a shock.  So when my husband piped up and said I should make a pumpkin pie this year, the wheels in my head began frantically turning.  There are so many options and variations of pumpkin pie!  Sure I enjoy a good slice of pumpkin pie on Thanksgiving, but I can't think of a time where I thought, "Oh, now this pumpkin pie is fantastic!" and if I'm anything, I'm a bit of a perfectionist when it comes to my cooking; I want it to taste phenomenal every time.  So, I jumped on Pinterest and began searching through my desserts board to find the links to my favorite blogs and dredged through their recipe archives to find the perfect pumpkin pie.  Here are a few of the options that I came up with:

Pumpkin Cream Pie
This recipe comes from the Pioneer Woman, and she is an inspiration!  I LOVE her blog and her recipes are always amazing!

Pumpkin Chiffon Pie
Cristina Ferrare's pumpkin chiffon pie
Pumpkin chiffon just sounds divine, all the spicy goodness of pumpkin, made light (not calorie wise though), fluffy and creamy.. Yum!  This recipe was found on Oprah, by Cristina Ferrare

Easy Pumpkin Pie with Press-In Shortbread Crust
Martha Stewart made it, so it must be good, right?!?  Plus it says "easy," which is always a bonus when we're talking about a dessert as complicated as pumpkin pie
Pumpkin Chiffon Pies
Another Martha Stewart masterpiece; can be made as mini pies or regular sized ones...
Then we have our two different Martha Stewart Pumpkin Cream Pies...
Pumpkin Cream Pie
and...
Pumpkin Cream Pie


Caramel-Pumpkin Layered Pie
Look at all those layer of goodness... Pic crust, then caramel with dark rum, then pumpkin chiffon, all topped with whipped cream. Yikes! From Parents.com
Chiffon Pumpkin Pie
Chiffon Pumpkin Pie
It looks so light and fluffy and delicious! Found at Parents.com
Spiced Pumpkin Cheesecake
Gotta love cheesecake!  From "Annie's Eats"
Silky Smooth Pumpkin Pie
pumpkin pie, under attack
This recipe comes from one of my favorite blogs (smitten kitchen).   It sounds DELICIOUS but fairly work intensive...
Double-Layer Pumpkin Cheesecake Streusel Pie with Rum Whipped Topping
This recipe originally consists of a gluten-free crust, but I would modify that portion, since it is not a concern for me or my family.  I have plenty of non-GF pie crust options to choose from as well...


Pumpkin Rum Pie
Which comes from Paula Deen (LOVE her) and sounded delicious, but didn't have a picture...

See my dilemma?!?!?  So many tasty options, so little time! But I must decide... I will let y'all know what I decide/come up with and get back to you soon with my resulting cooking adventure.

Much love!
~Rachelle